
DIY beeswax wraps are reusable, eco-friendly food covers made from cotton fabric coated with beeswax, providing a natural and sustainable alternative to plastic wrap that keeps food fresh and reduces plastic waste.
Diy beeswax wraps might just be the easiest eco-friendly swap you can make at home. Ever wondered how simple it is to ditch plastic wrap and craft something reusable? Let me walk you through making wraps that feel good to use and great for the planet.
What are beeswax wraps and why use them
Beeswax wraps are reusable food covers made from fabric coated with natural beeswax. They serve as an eco-friendly alternative to plastic wrap, helping reduce waste and keep your food fresh. The beeswax acts as a natural antibacterial agent, while the fabric provides a flexible, breathable barrier that protects food from air exposure without trapping moisture.
Why use beeswax wraps? First, they are sustainable and biodegradable, making them a greener choice for your kitchen. Second, they are versatile—perfect for wrapping sandwiches, covering bowls, or preserving fruits and vegetables. Third, these wraps can be easily cleaned with cool water and mild soap to trust in their reusability.
This simple swap supports a zero-waste lifestyle and reduces your plastic footprint. Plus, beeswax wraps often come in charming patterns, adding a personal touch to your food storage. Using beeswax wraps is a small step that contributes to a healthier environment while keeping your food protected naturally.
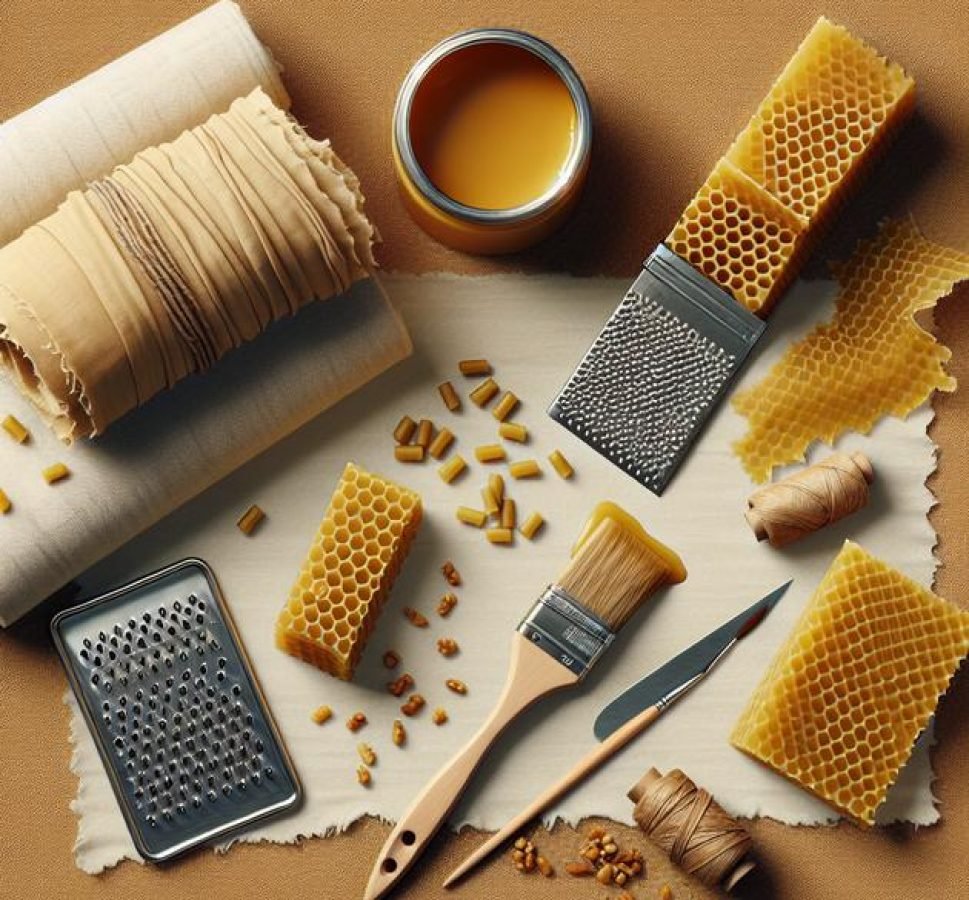
Materials needed for making beeswax wraps
To make your own beeswax wraps, you’ll need just a few basic materials that are easy to find. Start with 100% cotton fabric, preferably organic, as it absorbs beeswax well and is safe for food contact. Cut the fabric into squares or rectangles of your desired size.
You will also need pure beeswax pellets or blocks, which give the wrap its seal and water-resistant properties. Some people like to add a little resin or jojoba oil to improve stickiness and flexibility, but these are optional.
For applying the beeswax, a brush or grater works well. If using a grater, shave the beeswax directly onto the fabric. Then, to melt the beeswax evenly, you’ll need a baking sheet and parchment paper or an oven-safe tray. Alternatively, an iron covered with parchment paper can be used to melt the wax into the fabric.
Make sure to also have scissors for cutting fabric, and a clean workspace protected with newspaper or cloth to catch any drips. With these simple supplies, you’ll be ready to create practical and eco-friendly beeswax wraps at home.
Step-by-step guide to crafting your wraps

Start by preheating your oven to 200°F (93°C) and lining a baking sheet with parchment paper. Lay out your cotton fabric squares flat on the parchment. Sprinkle a thin, even layer of beeswax pellets over each fabric piece. If desired, add a few drops of jojoba oil for flexibility.
Place the baking sheet in the oven for about 3-5 minutes, or until the beeswax melts completely. Use a brush to spread the melted beeswax evenly across the fabric, ensuring full coverage with no dry spots.
Carefully remove the baking sheet from the oven, then lift each wrap by the corners. Wave it gently in the air for a few seconds until it cools and the beeswax hardens, creating a slightly tacky surface that sticks to itself and other surfaces.
If any areas are missed or the coating seems thin, repeat the melting and brushing process. Once done, your wraps are ready to use for wrapping food, covering bowls, or storing snacks.
Remember to let the wraps fully cool before folding or rolling them to avoid cracking. Store your finished beeswax wraps in a cool, dry place until needed.
Tips for customizing colors and patterns
Customizing your beeswax wraps with different colors and patterns is a fun way to add a personal touch and make them more appealing. Start by choosing cotton fabrics with patterns or colors that you love. Organic cotton with vibrant prints can brighten up your kitchen and make wrap use more enjoyable.
To create a unique look, you can layer different fabric squares by cutting shapes or combining prints before applying beeswax. Experiment with fabric placement to achieve interesting designs. Another way to add color variation is by mixing natural dyes into the beeswax before melting, such as turmeric for yellow or beetroot powder for pinkish tones.
If you’re crafty, consider using stamps or stencils on plain cotton fabric before coating it with beeswax. This adds extra flair while keeping your wraps food-safe. Remember to use non-toxic, fabric-safe dyes or paints.
Keep in mind that lighter-colored fabrics will show dirt more easily, so choose darker patterns for wraps you plan to use for messier foods. Additionally, mixing and matching styles can help you designate wraps for specific uses, like sandwiches or fruits.
These tips not only make your beeswax wraps visually pleasing but also encourage regular use, helping reduce plastic waste.
How to care for and clean your beeswax wraps
To keep your beeswax wraps effective and lasting longer, proper care is essential. Always clean your wraps with cool water and mild soap—avoid using hot water, as heat can melt the beeswax coating. Gently hand wash the wrap without scrubbing too hard to preserve the wax layer.
After washing, air dry your wraps by hanging them up or laying them flat. Do not wring them out or place them in the dryer, as excessive heat can damage the wax. Store your wraps in a cool, dry place away from direct sunlight, which can cause them to become brittle over time.
If your wraps start to lose stickiness or dry out, you can refresh them by rew axing: Simply melt new beeswax over the fabric using an iron or oven, then let it cool. This revives their sealing ability and extends their usability.
Be mindful to avoid contact with raw meat or very hot foods, as beeswax wraps are best suited for wrapping fruits, vegetables, breads, and cheese. For stubborn stains or odors, a light scrub with baking soda can help without harming the wraps.
Proper care ensures your beeswax wraps remain a sustainable and practical alternative to plastic wrap for months to come.
Benefits of switching to beeswax wraps from plastic

Switching to beeswax wraps from plastic wrap offers numerous benefits for both the environment and your health. Beeswax wraps are reusable, which means less plastic waste ends up in landfills and oceans, helping reduce environmental pollution. Plastic wraps often contain harmful chemicals that can leach into food, while beeswax wraps are made from natural, non-toxic ingredients.
By choosing beeswax wraps, you support sustainable beekeeping and organic cotton farming practices, promoting biodiversity and ecosystem health. These wraps are breathable, which helps food stay fresh longer by preventing moisture build-up that can cause spoilage.
Using beeswax wraps encourages a zero-waste lifestyle, saving money over time since you don’t need to buy disposable wraps repeatedly. They are easy to clean and maintain, making them a practical choice for everyday food storage.
This simple swap reduces your plastic footprint, supports healthier food storage, and contributes to a cleaner planet.
Common mistakes to avoid when making wraps
One common mistake when making beeswax wraps is using fabric that is not 100% cotton. Synthetic blends won’t absorb the beeswax properly, leading to poor wrap quality. Always choose natural, breathable cotton for best results.
Another issue is applying too much beeswax at once. A thick layer can make the wraps stiff and prone to cracking. Apply thin, even coats of melted beeswax to keep wraps flexible and durable.
Using high heat during the melting process can burn the beeswax, resulting in a sticky or brittle wrap. Maintain a low oven temperature around 200°F (93°C) and watch the wax closely to avoid overheating.
Not allowing the wraps to cool properly before folding or storing can cause cracks or stickiness. Be sure to wave the wrap in the air after melting to cool and set the wax evenly.
Lastly, neglecting proper care leads to shorter wrap life. Avoid washing wraps in hot water or putting them in the dishwasher, as heat can melt the wax coating away.
By avoiding these common mistakes, you can create long-lasting, effective beeswax wraps that serve you well.
Creative uses beyond food storage
Beeswax wraps aren’t just for storing food; they have many creative uses around the home. Use them to wrap and protect non-food items like soap bars, small plants, or craft supplies. Their flexibility and natural coating make them perfect for keeping delicate items safe and dust-free.
They also work well as protective covers for your phone, glasses, or notebook when you’re carrying them in your bag. The wraps provide a soft barrier to prevent scratches.
Craft enthusiasts can repurpose beeswax wraps for DIY projects, such as making natural gift wraps or decorative pouches by folding and securing the fabric with ribbons or twine. They add a handmade, eco-friendly touch to gift-giving.
Additionally, beeswax wraps can be used to freshen up spaces by wrapping dried herbs or flowers inside and placing them in drawers or closets. Their breathable material allows natural scents to gently disperse.
With a little creativity, beeswax wraps can replace many disposable products in your life, helping you reduce waste and live more sustainably.
Make the switch to beeswax wraps today
Making your own beeswax wraps is a simple, quick, and rewarding way to reduce plastic waste and keep your food fresh. With just a few natural materials, you can create versatile wraps that last for months.
By customizing colors and patterns, caring for them properly, and exploring creative uses beyond food storage, you’ll enjoy a practical and eco-friendly alternative in your daily life.
Switching to beeswax wraps supports sustainability and helps protect the environment without sacrificing convenience.
Start your DIY beeswax wrap journey today and join the movement towards a greener kitchen.


