
Pressed flower art is a creative craft that preserves natural flowers by drying and flattening them to create unique decorative pieces for framing, gifts, and mixed media projects.
Have you ever explored the delicate world of pressed flower art? It’s a charming craft where nature meets creativity, letting you bring flowers’ beauty indoors. Curious about how to start or fresh ideas to try?
What is pressed flower art and how does it work?
Pressed flower art is a craft that involves flattening and drying flowers to preserve their natural beauty and colors. This technique allows you to create unique decorations and artworks by arranging these delicate, dried flowers on paper, fabric, or other surfaces. The process begins by selecting fresh flowers and leaves, which are then carefully pressed using heavy books, a flower press, or specialized equipment to maintain their shape and color.
The key to successful pressed flower art is patience. Flowers need to be pressed and dried over several days to weeks until all moisture is removed, preventing decay. Once dried, the flowers become thin and fragile, making them perfect for intricate designs. Artists often use tweezers for precise placement and glue or resin to fix the flowers on the final medium.
Why pressed flower art is popular
This form of art captures the beauty of nature in a lasting way and adds a vintage, natural aesthetic to homes and crafts. Because it uses natural elements, every piece is unique and carries a story from the moment the flowers were picked. It’s a simple yet expressive way to connect with nature and personalize your living space.
Pressed flower art can be incorporated into greeting cards, bookmarks, framed pictures, or even jewelry. It is a versatile craft that anyone can try with basic materials, opening countless creative possibilities.
Essential tools and materials to get started
Starting with pressed flower art requires a few basic tools and materials that are easy to find and affordable. First, you’ll need fresh flowers and leaves; the best choices are those with sturdy petals like pansies, violets, and ferns, which press well and retain color.
Flower presses are essential for drying your blooms flat. You can buy a specialized flower press or make one at home using heavy books or wooden boards with clamps. Absorbent paper, such as parchment or blotting paper, helps remove moisture during pressing.
Other important materials include tweezers for delicate handling, scissors or garden shears to trim flowers, and adhesives like clear-drying glue or double-sided tape to fix the flowers onto your canvas or paper. For displaying your art, frames with glass protect your work from dust and damage.
Additional supplies
Depending on your project, you might use resin to create shiny, durable finishes or colored paper backgrounds to enhance your design. A soft brush can help clean particles off the pressed flowers without causing damage.
Having these tools ready will make your pressed flower art enjoyable and successful, allowing you to focus on creativity without interruptions caused by missing supplies.
Step-by-step guide to pressing flowers at home

To press flowers at home, begin by choosing fresh flowers with vibrant colors and dry petals. Avoid flowers with thick centers or too much moisture. Step 1: Gather your flowers and trim any unwanted leaves or stems.
Step 2: Place the flowers flat between two pieces of absorbent paper, such as parchment or blotting paper. This helps to absorb moisture during the pressing process.
Step 3: Sandwich the paper with flowers inside a flower press or between heavy books. If using books, add weight on top to ensure consistent pressure.
Drying time and checking progress
Leave your flowers pressed for about 2 to 4 weeks to fully dry. Check every few days to replace the paper if it becomes damp, which helps prevent mold.
Step 4: Once completely dry, carefully remove the flowers using tweezers. They will be fragile, so handle with care to keep petals intact.
Step 5: Use your pressed flowers in art projects, cards, or frames. To protect and preserve your work, consider sealing with clear adhesive or placing the artwork under glass.
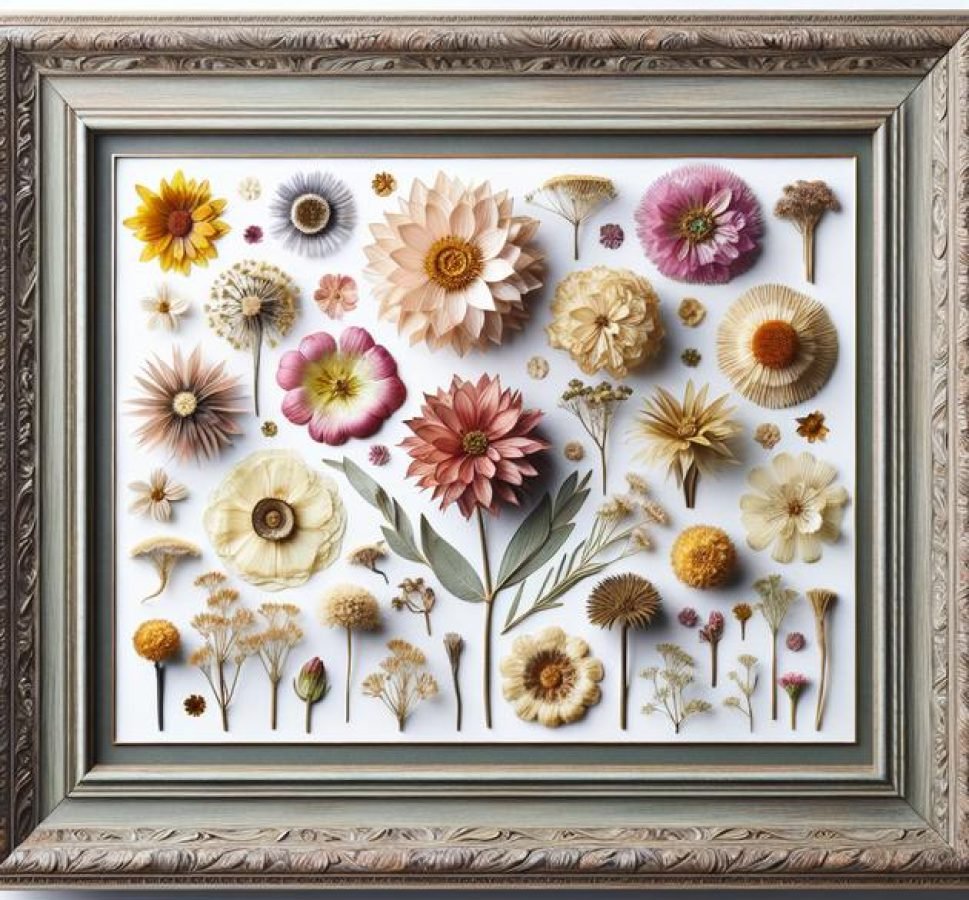
Creative ideas for framed pressed flower art
Framed pressed flower art offers endless opportunities to showcase nature’s beauty in creative ways. One popular idea is to arrange flowers in symmetrical patterns or mandalas within the frame, creating a visually pleasing, balanced design. Using contrasting colors and different sizes of flowers adds depth and interest to your artwork.
Layering is another technique where you place smaller flowers or leaves on top of larger ones to build texture and dimension. Try mixing leaves, petals, and even small seed pods for varied visuals.
Unique framing options
Consider using shadow box frames to give your art a three-dimensional effect, allowing you to include thicker elements or multiple layers without flattening the flowers too much. Glass frames with floating edges highlight the delicate nature of the pressed flowers by letting light pass through.
For a modern twist, incorporate geometric shapes or metallic accents around the flowers. You can also personalize frames with painted borders or decorative backgrounds like watercolor or vintage paper to complement the florals.
Combining pressed flower art with calligraphy or handwritten quotes adds a personal touch, making your framed piece a meaningful gift or home decor. Experiment with different flower types and arrangements to find unique styles that fit your taste.
Using pressed flowers to personalize gifts
Pressed flowers add a unique, personal touch to gifts with their natural charm and delicate beauty. You can decorate greeting cards by arranging pressed flowers on the front, creating a one-of-a-kind design that conveys thoughtfulness. Use clear-drying glue to secure the petals carefully without damaging them.
Gift tags and bookmarks are also perfect surfaces for pressed flowers. These small yet meaningful items become cherished keepsakes when adorned with colorful, flattened blooms. Add handwritten messages or calligraphy to enhance their sentimental value.
Creative personalized gift ideas
Another idea is to embed pressed flowers in resin to make jewelry pieces like earrings, pendants, or keychains. These lasting accessories carry a bit of nature wherever the recipient goes.
For larger gifts, decorate wrapping paper or gift boxes by gluing pressed flowers onto neutral-colored surfaces, making the packaging as special as the gift inside. You can even incorporate pressed flowers into handmade candles or soaps for a lovely, natural aesthetic.
Using pressed flowers for gift personalization not only shows extra care but also recycles natural materials creatively, making your presents unforgettable and eco-friendly.
How to preserve colors and shapes effectively

To preserve the vibrant colors and delicate shapes of pressed flowers, it is crucial to follow proper techniques during and after the pressing process. Choose flowers that are fresh and free from moisture to prevent browning or mold. Thinner petals tend to retain color better and press more evenly.
Use absorbent paper like blotting or parchment paper between flower layers to draw out moisture efficiently. Change the paper regularly if it becomes damp to avoid discoloration.
Protecting colors during pressing
Press flowers in a dry and cool environment, avoiding direct sunlight which can fade colors. Applying gentle pressure ensures the flowers dry flat without crushing their natural shape.
Once dried, handle flowers with care using tweezers to maintain their structure. To further preserve the colors, apply a thin coat of clear acrylic spray or a specialized flower sealant. This not only protects the petals but also adds a slight shine.
Store your pressed flower art away from direct light and humidity to keep it looking fresh for years. Framing your work behind UV-protective glass can significantly reduce color fading caused by sun exposure.
Incorporating pressed flowers into mixed media art
Incorporating pressed flowers into mixed media art allows you to blend natural elements with various artistic materials for unique and textured creations. Artists often combine pressed flowers with paint, fabric, paper, and even digital prints to add depth and organic beauty to their work.
Textured backgrounds made from acrylic paint, watercolor washes, or textured papers provide a rich canvas where pressed flowers can stand out. Experiment with layering flowers over painted areas to create contrast and visual interest.
Combining materials for effect
Use adhesives like gel medium or clear-drying glue to attach pressed flowers securely to your mixed media surfaces. Incorporate elements such as lace, fabric scraps, and threads to add tactile variety. Some artists also embed pressed flowers in resin or varnish for protection and shine.
Adding hand-drawn designs or stamped patterns around the flowers helps unify the piece, blending the natural with the crafted. You might also write quotes, poetry, or calligraphy to personalize and elevate the artwork.
Mixed media art with pressed flowers offers endless creative possibilities and allows you to experiment with different materials and techniques, resulting in truly one-of-a-kind pieces.
Tips for displaying and caring for your artwork
Displaying pressed flower art properly helps maintain its beauty and longevity. Choose locations away from direct sunlight, as UV rays can fade the colors over time. Framing with UV-protective glass is highly recommended to shield the art while enhancing its appearance.
Keep your artwork in rooms with stable humidity and temperature to prevent moisture damage or brittleness. Avoid placing frames in bathrooms or kitchens where humidity levels tend to be higher.
Best practices for care
When cleaning, gently dust the frame with a soft cloth; never use water or cleaning sprays on the pressed flowers themselves, as moisture can cause deterioration. If the artwork is framed without glass, consider sealing the flowers with a clear fixative spray for extra protection.
Rotate your displayed art occasionally to give it a break from light exposure, allowing it to stay vibrant longer. For storage, keep pressed flower pieces flat in acid-free paper and avoid stacking heavy objects on top.
Regular care and mindful display choices ensure that your pressed flower art remains a stunning part of your decor for years to come.
Wrapping Up Your Pressed Flower Art Journey
Pressed flower art offers a beautiful way to bring the charm of nature into your home. With simple tools and a little patience, you can create stunning pieces that brighten any space.
By following proper techniques for pressing, preserving, and displaying your flowers, you ensure your artwork lasts for years. Whether you incorporate pressed flowers into framed art, gifts, or mixed media projects, the possibilities are endless.
Enjoy experimenting with colors, shapes, and arrangements to make unique, meaningful creations that truly reflect your style. Embrace this creative craft to connect with nature and add personal touches to your surroundings.


